Shabby Blogs Background

Monday, February 27, 2012

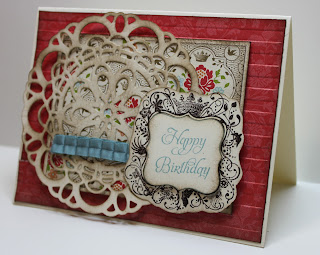
Vintage Birthday Card

Today is my brother's Mother-in-law's birthday. She has felt like another mother to me since Andrew and Jonina started getting serious and our kids refer to her as Amma Lynne, just like her actual grand kids do. So when we were invited over to my brother's to celebrate not only Marley's birthday but Lynne's too, I knew I had to make something special for her. I went into my stash of samples created by the clever ladies in my uplines and here is what I came up with.

I used what has become my go-to DSP when I want a vintage vibe - Everyday Enchantment from the Sale-a-Bration catalogue. I embossed the bottom layer with the Stripes Textured Impressions folder and inked the edges with Soft Suede (LOVE this ink colour! use it on most of my edges). The other pattern is actually the back side of the red patterned paper. I simply inked all the edges and mounted it on Very Vanilla before adhering it with Dimensionals. I cut out the doily with my Paper Doily Sizzlits Die and then brushed it all over with more Soft Suede. 

The sentiment was a multi-step process. First I stamped the curly frame image from Elementary Elegance Stamp set with Early Espresso ink. I then stamped over the image (as closely as I could) with some Versamark ink and heat embossed it with clear embossing powder. (I was rushed taking the pictures so it doesn't really show up. Bummer! Trust me when I say that the gloss is there - it's subtle but it adds quite a bit to the over all look of the card.) Then I nestled the Happy Birthday sentiment into the same frame image stamp and stamped the whole thing with Baja Breeze. This allowed me to cut out the inner frame and mount it with Dimensionals onto my embossed image. 
A little bit of the Pleated Satin Ribbon in Baja Breeze finished it off.


Thanks for checking out my little card. I'd like to take a moment to remind you that you have a little over a month left to earn free products like the DSP and stamp set I used on this card. Sale-a-Bration ends March 31st so place your orders now. Any orders of $60 qualify you to one free item. To check out the available products please follow this link.

Sunday, February 26, 2012

Happy Birthday Marley!

Today is my eldest daughter's 8th birthday. 8?!?! When the heck did THAT happen?!
Here is the card I whipped up yesterday for her. I wanted it to be girly but not too girly - to match her personality.

My card base is Very Vanilla card stock - I love this soft neutral for cards! 
I started with the cupcakes as that's what we made the other day for her birthday party. The top of the cupcake is Blushing Bride which I embossed with my Perfect Polka Dots Textured Impressions folder after I punched it out with my Cupcake punch
Then I started thinking about how I wanted the cupcakes to be layered. I decided to pop them up on top of flowers (as it has been feeling kind of Spring-like around here lately) so I used  the new Blossom Punch and some Twitterpated DSP with coordinating 1 3/8" circles. They needed a grounding base so I pulled out my Island Indigo card stock, embossed it with the same polka dot folder as the cupcake tops but I adhered it de-bossed side up for a bit of variety.
Finally the sentiment on top and the dots below were from the Create a Cupcake stamp set. The candles (8 in number) were an afterthought and were made with my cupcake punch again. Everything is better with a  little sparkle (same goes for layouts!) so I used my Dazzling Details on the candle flames and the polka dots on the cupcakes.


Thanks for stopping by. If you like my style please become a follower and you'll never miss a post again!
Enjoy the rest of your weekend.

Friday, February 24, 2012

Halloween layout for Get Picky

I know, I know! Spring is just around the corner so why am I scrapping Halloween? Because I can!! LOL!
Actually, it wasn't on my table to scrap. I did not wake up yesterday and say "I've got to get those Halloween pictures down on paper today!" But ... somehow it happened anyway!

I am a couple days behind with LOAD so I was working on the prompt for Day 22 which was "holidays". Our LOAD Scrapper on the Street, Dani did a layout about Halloween and I felt the pieces of my layout fall into place. Thanks Dani!! I was also able to combine a couple other challenges into it, namely Apron Strings Bake Your Cake challenge and Get Picky's sketch challenge.

Here's the sketch I used (loosely!)

And here's my layout.


I thought I'd use some leftover Halloween papers but I couldn't find any - I guess I used them up already. What I do have plenty of (kind of hording it 'cus I love it so much!) is the Spice Cake DSP from the Holiday mini (discontinued now - I checked the Clearance Rack of my On-line store but it's not there ... yet?) 


To create the title I used 3 different stamp sets - Jayne's Type AlphabetJust Perfect Alphabet and Calendar Alphabet & Numbers. I used my Stamp-a-ma-jig to get them perfectly aligned. (I totally meant to do that! Sigh. Clearly I need some practice!) The leaves were stamped using the Gently Falling stamp set (also from the Holiday mini so now discontinued - hopefully they bring it back for next year as it is a great set!) 


To add some distinctly Halloween elements I used 4 stamps from the Out on a Limb stamp set. This pumpkin one - 3 goofy pumpkins for my 3 goofy girls!


This little black cat for my little kitty.


And this little witch for my little witch. The broom and the witch are two different stamps - having the clear mount stamps means you can line them up to create a scene with ease (no Stamp-a-ma-jig required!)

Oh, and a quick comment on the jagged trim piece anchoring my pictures. This is an example of why I never throw anything away. This was a scrap that was created when I made the giant rosette for this layout. I saw it in my scrap bag and felt the jaggedness complimented my layouts theme.


I added bling in several locations in the form of Basic Rhinestones. I scattered some of the large ones in among the leaves and then used the small rope rhinestones two ways. One was under the kitty, in a straight line. The other you can see here - I curved it as I was sticking it down to create glittery swirls. The organic shape compliments the leaf cluster. 
My Apron Strings cake had bling as one of my ingredients (Sprinkles) so I was glad to incorporate it so cleverly here.

Finally, an apology. For using so many discontinued items. It was totally not my intention and to be honest I didn't even notice until I was writing this post and trying to link to the products. I am sure that all scrappers out there can attest to having older product in their stashes so please forgive me for trying to use mine up. I think a good take away tip for you is that products that are non-themed can still be used effectively on a themed layout. The Spice Cake DSP and the Gently Falling stamp set are most definitely NOT Halloween themed but the colours are a good match and when mixed with few Halloween stamps and some great pictures of kids in costume, they work well for this kind of layout.

Thanks for stopping by. Happy Stamping Everyone!

Friday, February 17, 2012

When I Grow Up ...

I am participating in this on-line challenge called LOAD (LayOut A Day) in which we create a layout a day for every day in the month of February. It's been pretty intense but a lot of fun! Check out the details here on Lain's site. Her theme this time round is "Past Perfect" and I've been able to scrap several stories from my childhood which has been incredibly fun, moving and cathartic.
Today's prompt was "When I Grow Up" and I was instantly reminded of a couple of pictures I came across recently of me opening up a Nurse's costume that my Mum made when she was at college. I was no where on her horizon but she hung onto it and gave it to me eventually. I in turn gave it to my eldest, Marley several years ago. I love that!
Anyway, this is the layout I created.

I used this sketch from Studio Calico and papers from Pocketful of Posies DSP. As you can see, it doesn't take a lot of paper to make an impact! 


Te create my title I used the Jayne's Type Alphabet stamp set. I stamped out my letters in Early Espresso onto Whisper White card stock then I cut them out and mounted them onto another piece of Whisper White using Dimensionals (that I cut to fit.)

For my journaling I typed out my story into Word then printed it off onto Whisper White card stock. Then it was just a matter of cutting and pasting!


To create some interest on the background I stamped images from Circle Circus in four different colours - Poppy Parade, Baja Breeze, Soft Suede and Early Espresso.

Thanks for stopping by. If you enjoy what you see please leave a comment so I know you were here!

Tuesday, February 14, 2012

Valentine's Day Treats

Some eye candy for you and some real candy for my girls! Check it out ...
So the little buckets were purchased at Dollarama and then I filled them with candy hearts.

To get the hearts to stand up in the tins I attached a clothes pin to the bottom and hid it among the candies.

Here's how I made the Valentines: using the Hearts Framelits Dies, I cut out a piece of Melon Mambo card stock with the largest size heart and started layering. First is a piece of Very Vanilla Card stock (which I inked around the edges with Melon Mambo ink) then a Dollar Store doily spritzed with Smooch Spritz in Blushing Bride. On top of that I put a piece of Everyday Enchantment DSP (once again, inked around the edge) and finally a monogram.
The monogram was made with the Alphabet Soup On Board letters that I inked in Melon Mambo then covered in Dazzling Details. (Note to self - 3 hours is not quite enough drying time!)

For the back I stamped some images and sentiments from P.S. I Love You onto another Very Vanilla heart inked around the edges with Melon Mambo ink. To get the different colours on the strawberry I used my Stampin' Write Markers in Riding Hood Red, Chocolate Chip and Garden Green. It's very easy to use these markers on Stampin' Up stamps to create custom coloured stamped images. Just colour the stamp, huff on it to re-moisten the ink and stamp as normal. Voila! Custom coloured images!

And the husband wasn't left out of the hand made card parade. He received this lovely card that I made at an Upline meeting a couple weeks ago. Thanks to Kristina for the cute make-and-takes!!


This card also uses the P.S. I Love You stamp set and what I really love (and a great reason to go to my meetings so I can learn tricks like this to teach my customers!) is the one heart we covered in Cherry Cobbler Dazzling Details. A simple thing but what an impact!


A few last pictures showing the fun my girls had making Valentine's for their class mates. I offered this as a class but had no takers so my girls got to go nuts!


Even little Christine got in on the action!


These are the ones I made for their teachers. The biggest heart is cut from a piece of Beau Chateau DSP.


Here are Christine's finished ones. In all honesty, I think she had more fun handing them out to her little friends than she had making them!

Okay, that's all I've got for you today. I hope your Valentine's Day was a love filled as mine was!


Tuesday, February 7, 2012

Project 12 My Way

Hello fellow crafters!
I've got another layout to share with you today as well as a card.

For the past 2 years I have played along with Davinie Fiero and Scrapbook and Cards Today in their Project 12 Challenge. The idea was that each month we were given a Becky Fleck Pagemaps sketch to play with and we created a month-in-review type page. I loved getting a new sketch each month and loved seeing how all the different participants interpreted them. This year they have changed the format. There are no new sketches (although we are welcome to mine their archives and re-use a sketch from the past 2 years) and instead of making it strictly about the entire month we can pick any topic, week, day, whatever to scrap. They have (and I think this will be a monthly thing) given us a colour scheme as an added challenge. I'm not thrilled about the changes but have decided that since my favourite part of the whole thing was documenting each month in one layout, that's what I'm going to take from it and continue doing.

So ... I decided to use a new sketch and used PageMaps' January 2012's double page layout sketch.

And this is what I came up with.


As you can see I used the sketch as a jumping off point but my pictures seemed to want to be arranged in a slightly different way. So I went with it!

Here are some close ups.

The left side - I used Crumb Cake smooth card stock as my base and layered two pieces from the Everyday Enchantment line in the background. 

The right side - I moved the title and journalling block to this side - again, it just seemed to want to be there!

I had a lot to say so I decided to type it up. I printed it onto Very Vanilla card stock and cut out the individual paragraphs for a more casual look.

My snowflakes (kind of fun that we actually had snow so I could use them!) were made with the Snowflake #2 die for the Big Shot (the large snowflake) and the snowflake punch. To attach them to the page and to add some sparkle I used the flower Brads. And speaking of sparkle, I also gave the snowflakes a liberal spraying of Vanilla Shimmer Smooch Spritz. The shine is subtle but it's there!

Here is the smaller snowflake with the smaller size of flower brad.

For my title I used the Alphabet Soup On Board letters. They are raw chipboard so I coated them with two coats of Very Vanilla Craft Ink and a liberal coating of Vanilla Shimmer Smooch Spritz. 

Here is another of the snowflakes and you can also see that I popped up my title letters with Dimensionals for even more texture. I think the snowflake is curling up so much because it was slightly wet when I attached it to the page. I'm sure it will lay flat once it's in a page protector!

Everything I've highlighted is available for order through me or through my on-line store (just follow the links). The Everyday Enchantment DSP is only available as a Sale-A-Bration purchase through me. The best way to get it is to host a workshop and for every purchase of $60 you get to choose one free item from the Sale-a-Bration list. 

Here is another project I did using this DSP.


I made these cards for an upline group meeting last week. We have card swaps so in return for making these, I got some really cute cards for my display board. 
To make this card I took a piece of the Everyday Enchantment DSP, cut it to size then ran it through my Big Shot using the Framelits Dies Hearts Collection. Behind the heart cut out I mounted both a smaller heart and a doily made using the Paper Doily Sizzlit Die which I had lightly sprayed with Log Cabin Smooch Spritz.
The bit along the bottom was created by rolling one of our Stampin' Wheels along a piece of Very Vanilla card stock with the Decor standard wheel in Calypso Coral ink. I then tied a piece of Calypso Coral 1/8" Organdy ribbon around it and through a Designer Series button from the Neutrals collection.

Hope you like these projects. If you are interested in making something similar please use the link at the side to email me. Space is still available in the Mommy and Me Valentines class so sign up now!
Thanks and Happy Crafting!

Friday, February 3, 2012

Valentine's for Mom and Me

Are you tired of sending out the same old store-bought cheesy Valentine's to your kids' classmates?
Would you like to send out homemade Valentine's but don't have the supplies or the ideas?
Do your kids hound you (speaking from personal experience here!) for paper, glue and scissors and then leave a mess expecting you to clean it up?

I have the solution!

Come to my house next Saturday and I'll clean up after your kids!

Here's a look at what I've got gathered - so far - for you and your child(ren) to work with.

If there aren't enough hearts here to inspire some lovely Valentine's for your child's classmates then I'm not sure what else to do!!  


Choose your background heart colour, add a doily, stamp away and glue on some hearts. 


Easy peasy?


You will also have access to some Smooch Spritz in red (or clear) that would look really cute on those doilies!!

If you are interested, please leave a comment here (or on Facebook if that's where you're reading this) or email me using the link in the side bar. Cost is $25/child with each additional child being $15. Your child will be able to make a Valentine for each member of their class and one (larger one) for their teacher. 
Mom's if your child is a bit older and doesn't require your help, feel free to bring your own projects to work on. For a $5 drop-in fee you can have access to all my stamps, inks, punches and Big Shot dies. All I ask is that you bring your own project supplies, scissors and adhesive. I will also have some card kits for you to purchase and make here or at home.

When you ask? Saturday Feb 11th at either 2:00 - 4:00PM or 7:00 - 9:00PM. Just let me know which time slot you'd like. Ladies, if you're coming to the later time slot feel free to BYOB!!

Thanks, hope to see you there.

Oh, and since it is Sale-a-Bration right now, any purchases over $60 qualify for a free item from the Sale-a-Bration list. I may even have a few extras on-hand for you to take home right away if you place a qualifying order!