Shabby Blogs Background

Showing posts with label Typeset Alphabet Die. Show all posts

Tuesday, July 31, 2012

Project 12 for June 2012

I'm back with another layout for my Project 12 album. July is almost finished which led me to start thinking about this project, which then led to realize I'd neglected to do my June 2012 layout. Using another sketch from Pagemaps and the Patio Party DSP collection I came up with this.


This is the sketch I used from June's Pagemaps.

Here's a close up of the left hand page. 

And the right hand page. 

As you can see I stamped a tone on tone border on 3 sides of the layout using Flowering Flourishes. I embellished some of the flowers with rhinestones - the last thing I did to finish off this layout!
Again I have used WAY more photos than the sketch called for but to keep them from overwhelming the layout I created a grid pattern and mounted them all onto Whisper White card stock. This left me with just enough journaling space for what I had to say!

Some more close ups for you .. starting with the title.

This technique should be pretty familiar to you all by now. I cut out my title using some leftover chipboard and my Typeset Alphabet die for the Big Shot. I then inked them in Baja Breeze (including inking the edges with my Baja Breeze Stampin' Write marker) and then flooded them with Cyrstal Effects.

The Patio Party DSP collection includes a sheet with lots of different patterns in strips - perfect for creating borders. I liked these banners and had originally left them uncut but felt the layout needed a bit more texture and interest. I got the idea of fussy cutting all the little banner flags out and really love the final look. It was literally a pain to do - my hand was seriously cramping by the end of it - but worth it I think!

To embellish the journaling block I played with the Reason To Smile stamp set (a special right now - see my side bar). It is a double stamp stamp set. This means you get a solid image for each flower plus the outline/detail stamp. I knew I was going to be cutting them out so I wasn't too concerned with stamping within the lines. In fact, I stamped the small blue flowers multiple time which gave them a cool layered look! Once the base colours were stamped I got out the coordinating Stampin' Write markers and added some shading and depth. I also used my blender pen to give it a more realistic look.

A closer look at the back ground stamping.

In this picture you can see the subtle texture that the solid flower stamp have.

Thanks for coming by again today. Do you document each month in any way? If so I'd love to check it out. Please leave me a link in the comments section. Hope you have a wonderful, sunny Tuesday!

Here are your links for products featured in this post.
Reason To Smile stamp set (only $5 with a purchase of $60 ENDS TODAY!)


Friday, July 20, 2012

Starting Point Layout - Party Monsters

I managed to finish the latest Starting Point Layout this afternoon. If you stopped by earlier today you saw a sneak peak on this post. To see Shimelle's Starting Point post please go here. I am having so much fun with these! I think I like this idea better than a sketch. Gasp! Is that wrong? :) I have my reasons though. Sometimes I find sketches tough if I have more pictures than it shows (not surprisingly this frequently happens to me) or my title and/or journalling don't fit where the sketch suggests putting them, or my embellishments are the wrong size, etc. I know that the whole idea of a sketch is to help with the placement of design elements to make the whole process faster but to be honest, using them almost makes me scrap slower. Maybe it's the rules follower in me that feels the need to actually follow the sketch!! LOL! Whatever the reason, I find Shimelle's starting points freeing. It's like once the background is in place I am free to fit my photos, title, journalling and embellishments where ever I want. Sound crazy? Give it a try and then tell me if I'm crazy or not!!

Anyway, enough rambling. I knew I wanted to play with the new Hallowe'en DSP and when I went hunting for photos I found ones of Marley's first Hallowe'en party. I even had the exact number and sizes of photos that Shimelle had used. It was total kismet!! Here is my finished layout.


And here's a reminder of how I started.


The new papers from Stampin' Up! (Howlstooth and Scaringbone) don't have any red in it but my pictures did so I used my designer discretion to add a block of Real Red to mat the photos onto.


The title was (of course) cut out with my Big Shot using the Typeset Alphabet dies but before I did that I embossed the Tangerine Tango card stock with the new Wood Grain embossing folder. I also lightly brushed  the raised parts with Basic Grey ink.

And then I had a bit of fun. In the soon to be released Holiday Mini Catalogue is a kit to make treat bag labels. It uses a new stamp set called Googly Ghouls and comes with googly eyes. I used the spider and BOOOO images elsewhere on the layout and then came up with the idea of turning the middle of the O into a mummy using the googly eyes and some white bakers twine. Isn't he cute?

Here's a look at the spiders. Also in this picture are some large ink splotches (straight from my re-inker bottle), some smaller ink flecks (using my Aquq painter), a rhinestone that I coloured black with a Sharpie and a red and black stamped butterfly image from Papillon Potpourri. I felt I needed to bring some of that red out from behind the pictures and spread it around a bit.

Well, that's it. Thanks for stopping by. Enjoy your weekend everyone and here are your links to available products featured on this layout.


Sunday, July 1, 2012

Card Making Canadians Canada Day Blog Hop

Hi there! Thanks for joining us today on this blog hop. We are a small group of Card Making Canadians from all over Canada that wanted to have a fun blog hop to celebrate Canada Day! Today we're sharing with you cards that have been created with either Canadian products, a Canadian theme or Canada's colours! We hope they inspire you! And Happy Birthday Canada!! 145 years young today!


You should have come here from the lovely Chelle's Blog but if you just stumbled upon my blog and want to go back to the beginning of the hop then please go to the Creative Accents blog and follow the links. Be sure to leave a comment as there is a $20 gift certificate to the Creative Accents online store up for grabs - details are at the end of this post.  If you have joined me from Practical Scrappers, welcome. I am so excited to be a new PS designer!!

I have two projects to share with today. The first is a layout (I know, I know, we advertised cards but I'm a layout girl at heart!!) with a very Red, White and Maple Leaf theme!


The journalling is more reflective than normal (I've been working my way through Shimelle Laine's Cover to Cover class and I'm suddenly feeling the need to write down more than I normally would.) It reads: "I was not born in Canada. I moved here with my family in 1981 and became a Canadian Citizen a few years later (1984? '85?) I love being British and I am proudly Canadian! I love that I can be both at the same time and not feel any disloyalty to either party. My daughters ARE Canadian though. Born and bred (so far) and proud of it! We didn't have "British Day" growing up but we were sure to celebrate Canada Day at Fort George park (in Prince George) with different ethnic food vendors, bands, entertainers and lots of good friends, One of the best things about living in a  small town again is discovering similar events that we can attend and that become part of our family traditions. These pictures are from the 2009 Canada Day Pancake Breakfast held in the street in front of the Delta Museum. The food is good, there are always fun bands playing - usually Celtic bands which particularly warm my heart - and if we time it right, we get a yummy strawberry cake made with berries from just down the road.  We make every effort to go every year both to celebrate our country's birthday, and to connect with our community."

Some close ups of the details for you.

The maple leaves are stamped using the two part stamp set called Gently Falling. I used Real Red for the leaves and Basic Gray for the outline. The chipboard letters were cut out with my Big Shot (took a bit of muscle but I love the outcome!) using the Typeset Alphabet die and then coloured using Basic Gray. I added some rhinestones for a bit of sparkle too!

To make sure the sides of the chipboard letters were coloured also, I used my Basic Gray Stampin' Write marker to ink the edges.

The patterned paper you see is from the Designer Series Paper Patterns Stacks in Real Red and Whisper White. These are great pads of paper full of sheets in each colour family and simple, basic designs that can accent any project perfectly.

My next project is (as this hop promised) a card! Another of the fabulous things about living where we live is that during the summer we have a market in the streets of "down town" every other Sunday. Last Sunday was a gorgeous day so we went for a wander. Lo and behold there was a booth (The Old Island Stamp Company) selling stamps!! Canadian made stamps no less. I crossed my fingers and prayed they'd have something I could use to make a truly Canadian card for today. Here it is ...

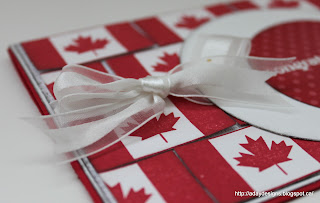
I purchased a Canada Flag stamp which is stamped in Real Red onto Whisper White card stock and then cut out to create this tiled effect on the card base. 

I used a scrap of Whisper White Organza ribbon to create a bow.

This little maple leaf was the other stamp I purchased which I stamped in Basic Gray and fussy cut. I used Dimensionals to lift it off my card and give it more presence. 

The "congratulations" sentiment was stamped into Versamark then Whisper White Craft ink THEN heat embossed with white embossing powder. I wanted to make sure it was as white as it could be!! 
This card is currently winging its way to my aunt who moved to Canada 12 years ago when she married a Canadian and who just recently (sorry Aunt Moira, I've forgotten exactly when!) got her Canadian Citizenship. I felt the need to send this to her as a reminder of how proud I am that she is now a Canadian too. Truly we are a diverse nation!! Awesome!!

Well, thanks for joining me today. Your next stop on the Hop is Janet. Here is the complete list for you. 

  1. Tara Nixon http://creativeaccents.blogspot.com
  2. Tracy http://tracystreasures-tracy.blogspot.ca/
  3. Barbara G. http://barbscreativecorner.blogspot.ca/
  4. Sarah http://scrapsbysarah.blogspot.ca
  5. Roxy http://roxyrolla.blogspot.ca
  6. Luce Lavertu http://myvintagecat.blogspot.com
  7. Chelle http://maybecreative.blogspot.com
  8. Alison Day http://adaydesigns.blogspot.ca/ - YOU ARE HERE
  9. Janet http://hilltopcreations.blogspot.ca/
  10. Donna Whiteman http://yellowdoggreetings.blogspot.ca

Please be sure to leave comments on all the blogs as Tara will be selecting one random comment from one random blog to receive a $20 gift certificate to the new Creative Accents online store!! How awesome is that, eh? (Ha, ha, ha! Had to include it at least once on this Canadian blog post!!)


Here are your product links from today's projects:
Gently Falling stamp set
Big Shot
Typeset Alphabet Die
Basic Rhinestones Jewel Accents
Designer Series Paper Patterns Stack - Brights and Neutrals Collections
Whisper White 5/8" Organza Ribbon
Stampin' Dimensionals

Thursday, June 21, 2012

May 2012 P12 Featuring Summer Smooches

This catches me up in my 2012 Project 12 album. What a nice feeling!
Since the main event this month was our family trip to Disneyland, I felt it appropriate to use mostly Disney pictures!


Here is the PageMaps sketch that I used (from the May 2012 sketches.)
I flipped the sketch to accommodate my chosen photos.

And here are close ups of each page.


As you can see, I didn't do a whole lot of stamping on this layout (just the 'happy birthday' underneath Greg's picture and the numbers.) Sometimes I'm "feeling" the stamping, and sometimes I'm  not. And that's okay! For this layout it was really more about playing with all the different paper patterns in the Summer Smooches collection. The red and white polka dot is NOT from Summer Smooches however, it is from another new collection called (appropriately enough) Polka Dot Parade. Check out the links below to see all the colours this comes in. It's a great set to have on hand to enhance other collections.

It was Greg's birthday on our last day at the park so I made him go to the City Hall and get a birthday button. To further highlight this picture I created a little banner below it and just stamped the 'happy birthday' sentiment from Best Dad Ever. My Basic Black ink pad needs to be re-inked so to make it look intentional I stamped off some images to give them a more faded look. 

My title. 
I cut out the letters with my Typeset Alphabet die and the numbers were stamped using one of the stamps in the Patterned Party stamp set (really finding this super versatile!!) and then fussy cut. (Also did this to get the '42' for Greg's birthday picture.) To dress it up a bit I added the pen faux stitching. I liked the stitch look so much I did it on the rest of the layout!

My journalling block.

And one last picture to highlight (you Moms out there will know why I'm highlighting this!!) Yes, this is Christine in the potty. The story is this; Christine is my last baby and while she's been wearing Pull-Ups for months now and we had been flirting with potty training, we hadn't committed 100% to the process. For many reasons, not least of which being my resistance. Not because I wished her to remain little (although that may have been a tiny part of it) but because I still retained very vivid and horrid memories of potty training Paige and didn't fancy repeating them with Christine. As it turned out I needn't have worried as she took to it very quickly (once we'd fully committed - after returning from Disneyland) and now I am revelling in the process of getting rid of things like diaper bags, change tables, diaper pails, etc etc etc. Ah, freedom!!

Thanks for stopping by. If you liked this please leave me some love! I may even visit you and return the favour!! Last but not least, here are your links.

Summer Smooches DSP
Polka Dot Parade DSP
Patterned Party stamp set
Best Dad Ever stamp set
Typeset Alphabet Die

Monday, June 18, 2012

Project 12 using Floral District

I am finally caught up with my Project 12 album - yay! It is unusual for me to get 2 months behind so it was really weighing on me. A lot of things have been weighing on me lately which (if you follow either of my blogs) you probably gathered just by the fact that I've been a bit MIA lately. I think I may be back on track ... ish ... but time will tell.

As an aside, can I ask a favour of those (few) of you who do follow me here or on Facebook? Can you please share this post with your own followers/friends? I am feeling a bit of frustration that my sites are not growing as quickly (or at all!) as I'd hoped so am reaching out to you good people to help spread the word. While we're at it, do you have any suggestions for content or improvements? I would really appreciate your input!! Thanks.

Okay, back to my Project 12 layout. This is for April and I see that I used the same sketch as my buddy Roxy. Here is my interpretation.

If you've taken a look at Roxy's layout you'll see that I have quite a few more pictures on mine. It's a weakness of mine, I admit it! Must. Use. Many. Pictures. Always!

This is the PageMaps sketch I used. Loosely! 

And some close ups ... first the left hand page.


And the right hand page.


Some close ups of the details.

Loving my new Alphabet die! 

Here you can see some of the papers in the Floral District DSP pack as well as one of the new Naturals Designer Buttons - lovely wooden buttons!

I loved the stamping I'd done on Starting Point layout so added it on this one too.

Okay, that's it. Here are your links - thanks for stopping by. If you liked this please leave me some love!

I've decided to enter this into Creative Accents Buttons and Twine challenge for June. Check them out at the link above.